ROS for Arduino - rosserial
 By Anna Sandler
Every time roboticists create new custom hardware for their robots, they reinvent the wheel by writing new protocols for the electronics to communicate to their computers and writing new hardware-drivers to control to those electronics.
Willow Garage extended the ROS communication framework down to embedded hardware and released rosserial. Rosserial allows electronics to talk directly to the rest of the ROS system. They can use ROS topics, ROS services, and other features of ROS.
For example, you can now take an Arduino, a popular 8-bit microcontroller, and use it with a variety of cheap sensors. We can hook it up to an ultrasonic sensor and it can directly publish a float32 message with the distance. With no extra effort, all my notes can receive its data and an RX plot can even plot the distance to the nearest obstacle.
Rosserial becomes even more powerful when you use the additional tools provided in its stack. There is a rosserial XB package that can configure XB radio transceivers and communicate over them using rosserial. With these tools, you can set up a network of custom ROS center nodes or even use it to control a small, custom robot without writing a single hardware driver.
Arduino, Ultrasonic Sensor and ROS
You will need an Arduino board, a SRF08 Ultrasonic sensor, and a way to connect your sensor to your Arduino such as a breadboard or protoboard.
Below is the diagram for setting up the sensor and a typical Arduino board. The only additional circuitry necessary are two 1.8kOhm pullup resistors as seen below.
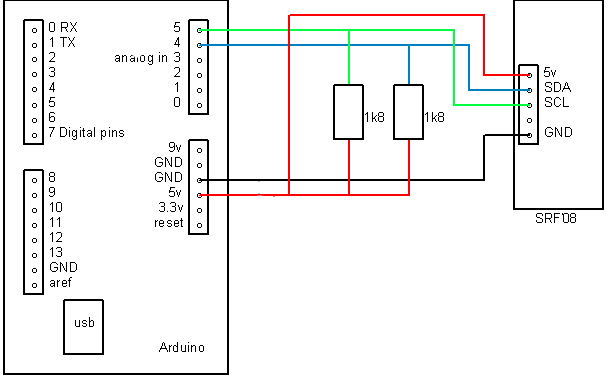
Image and code example courtesy of ROS.org
Next, open up your Arduino IDE and copy in the code below.
/*
* rosserial SRF08 Ultrasonic Ranger Example
*
* This example is calibrated for the SRF08 Ultrasonic Ranger.
*/
#include //SRF08 specific library
#include
#include
#include
#include
//Set up the ros node and publisher
std_msgs::Float32 sonar_msg;
ros::Publisher pub_sonar("sonar", &sonar_msg);
ros::NodeHandle nh;
Sonar_srf08 MySonar; //create MySonar object
#define CommandRegister 0x00
int New_Address = 248; //0xF8
#define ResultRegister 0x02
float sensorReading =0;
char unit = 'i'; // 'i' for inches , 'c' for centimeters
void setup()
{
MySonar.connect();
MySonar.changeAddress(CommandRegister, New_Address);
New_Address += 4;
nh.initNode();
nh.advertise(pub_sonar);
}
long publisher_timer;
void loop()
{
if (millis() > publisher_timer) {
// step 1: request reading from sensor
MySonar.setUnit(CommandRegister, New_Address, unit);
//pause
delay(70);
// set register for reading
MySonar.setRegister(New_Address, ResultRegister);
// read data from result register
sensorReading = MySonar.readData(New_Address, 2);
sonar_msg.data = sensorReading;
pub_sonar.publish(&sonar_msg);
publisher_timer = millis() + 4000; //publish once a second
}
nh.spinOnce();
}
To run the app, simply run the following lines:
roscore
rosrun rosserial_python serial_node.py /dev/ttyUSB0
rostopic echo sonar
That’s it, it is that simple to get data from Arduino into ROS.
read here
cheats why men cheat on beautiful women
will my wife cheat again
go meet and cheat